androidlistview的用法(androidinflate详解)
犹豫了几天,觉得还是把这个教程写一下吧。虽然在网上已经一大堆了,但是这是我学习的历程我觉得我还是该记录下来,以后也可以温故而知新。
ListView在Android众多控件中占有比较重要的地位,也是面试官热爱提问的控件之一,特别是关于它的性能优化。这一块我想着把它留到最后再说,我们先来谈谈ListView的简单应用,毕竟什么东西都是由浅入深的嘛。
首先我们要先创建一个项目,打开Android studio点击File—New—New Project创建一个名为ListViewTest的项目。接着找到res—layout文件夹下的activity_main.xml,打开它并且在里面添加ListView控件如下:
<ListView android:id="@+id/listview" android:layout_width="match_parent" android:layout_height="match_parent"> </ListView>此时你如果运行项目你会发现里面什么都没有,和刚开始创建的这个项目时没多大区别,因为我们还没有往里面添加数据并且在View中实现它。所以我们回到MainActivity这个类里面通过findViewById()这个方法找到这个控件并且实现。我们先定义一个名为data的一维字符串数组,用来存放我们的假数据。然后通过新建一个ArrayAdapter并根据要求配置它,再Adapte通过setAdapter给ListView,代码如下:
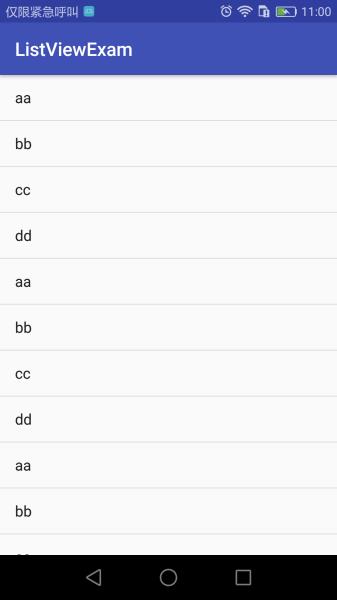
private String data[] = {"aa","bb","cc","dd","aa","bb","cc","dd","aa","bb","cc","dd","aa","bb","cc","dd"};//假数据 @Override protected void onCreate(Bundle savedInstanceState) { super.onCreate(savedInstanceState); setContentView(R.layout.activity_main); ListView listView = (ListView) findViewById(R.id.listview);//在视图中找到ListView ArrayAdapter<String> adapter = new ArrayAdapter<String>(this,android.R.layout.simple_list_item_1,data);//新建并配置ArrayAapeter listView.setAdapter(adapter); }点击运行项目你就能看到一个简单的ListView:
现在看到了界面了但是离我们的预想还是有点差距,我们希望的是除了能看还能点击响应某些事件,因此我们再为它添加一个监听点击的方法。代码如下:
listView.setOnItemClickListener(new AdapterView.OnItemClickListener() { @Override public void onItemClick(AdapterView<?> adapterView, View view, int i, long l) { switch (i){ case 0: Toast.makeText(MainActivity.this,"你点击了"+i+"按钮",Toast.LENGTH_SHORT).show(); break;//当我们点击某一项就能吐司我们点了哪一项 case 1: Toast.makeText(MainActivity.this,"你点击了"+i+"按钮",Toast.LENGTH_SHORT).show(); break; case 2: Toast.makeText(MainActivity.this,"你点击了"+i+"按钮",Toast.LENGTH_SHORT).show(); break; case 3: Toast.makeText(MainActivity.this,"你点击了"+i+"按钮",Toast.LENGTH_SHORT).show(); break; case 4: Toast.makeText(MainActivity.this,"你点击了"+i+"按钮",Toast.LENGTH_SHORT).show(); break; } } });这里我就给了5项Item做了响应,当然也可以让每一项都有响应的,有兴趣自己可以去尝试。这样一个非常简单的ListView就完成了,接下来我们来深入一点点。
现在我们要定制一个有图片有文字有选择框的ListView,怎么做呢?第一个我们肯定要把数据改一下,但是我们肯定不可能说把数组data改成二维数据就可以的,因为图片不是字符串的形式啊。那要包含字符串又能包含图片的数据格式有什么呢?这时Bean类就出现了,我们可以把这些数据封装到一个Bean类里面啊,当我们需要的时候就直接拿出来就好。说做就做然后我们定义一个myBean类,代码如下:
public class myBean { private String text;//用来放文字的 private int ImageID;//用来放图片的 public myBean(String text,int imageID){ this.ImageID = imageID; this.text = text; } public String getText() { return text; } public void setText(String text) { this.text = text; } public int getImageID() { return ImageID; } public void setImageID(int imageID) { ImageID = imageID; } }然后我们就可以通过初始化不断的New一个一个的数据了,但是我们怎么放进ListView里面呢?因为我们刚才用的是系统的ArrayAdapter来适配到ListView的,我们甚至连要适配的XML的界面都没。那我们先去做个我们要适配的界面去看看,于是:
<LinearLayout xmlns:android="http://schemas.android.com/apk/res/android" android:orientation="vertical"android:layout_width="match_parent" android:layout_height="match_parent"> <LinearLayout android:id="@+id/ll_view" android:gravity="center" android:layout_margin="10dp" android:orientation="horizontal" android:layout_width="match_parent" android:layout_height="wrap_content"> <ImageView android:background="@mipmap/ic_launcher" android:id="@+id/headimage" android:layout_width="wrap_content" android:layout_height="wrap_content" /> <TextView android:layout_marginLeft="20dp"android:layout_weight="1" android:text="你是SB" android:id="@+id/headtext" android:layout_width="0dp" android:layout_height="wrap_content" /> <RadioGroup android:id="@+id/radioBtn" android:orientation="horizontal"android:layout_width="wrap_content" android:layout_height="wrap_content"> <RadioButton android:text="打他" android:id="@+id/radio2" android:layout_width="wrap_content" android:layout_height="wrap_content" /> <RadioButton android:text="不打" android:id="@+id/radio1" android:layout_width="wrap_content" android:layout_height="wrap_content" /> </RadioGroup> </LinearLayout></LinearLayout>于是我们把之前的R.layout.simple_list_item_1这XML换成我们直接做的,运行程序你就会发现程序崩了。哈哈,不要紧这是正常的因为我们传入的数据都没用适配到我们的界面上。所以我们就只能自己写过一个适配器来适配我们自己的数据。
ArrayAdapter<String> adapter = new ArrayAdapter<String>(this,android.R.layout.simple_list_item_1,data);适配器代码如下:
public class myAdapter extends ArrayAdapter { private final int ImageId; private String radiotext; public myAdapter(Context context, int headImage, List<myBean> obj){ super(context,headImage,obj); ImageId = headImage;//这个是传入我们自己定义的界面 } @NonNull @Override public View getView(final int position, @Nullable View convertView, @NonNull ViewGroup parent) { myBean myBean = (myBean) getItem(position); View view = LayoutInflater.from(getContext()).inflate(ImageId,parent,null);//这个是实例化一个我们自己写的界面Item LinearLayout linearLayout = view.findViewById(R.id.ll_view); ImageView headImage = view.findViewById(R.id.headimage); TextView headText = view.findViewById(R.id.headtext); RadioGroup radio = view.findViewById(R.id.radioBtn); headImage.setImageResource(myBean.getImageID()); headText.setText(myBean.getText()); radio.setOnCheckedChangeListener(new RadioGroup.OnCheckedChangeListener() {//检查Radio Button那个被点击了 @Override public void onCheckedChanged(RadioGroup radioGroup, @IdRes int i) { switch (i){ case R.id.radio1: radiotext = "不打"; break; case R.id.radio2: radiotext = "打他"; break; } } }); linearLayout.setOnClickListener(new View.OnClickListener() {//检查哪一项被点击了 @Override public void onClick(View view) { Toast.makeText(getContext(),"你点击了第"+position+"项"+"你选择"+radiotext,Toast.LENGTH_SHORT).show(); } }); return view; }}现在适配器也写好了,你看定制ListView的2个步骤是不是就这样就被我们解决了,然后我们就差适配了。接下来我们来做一下适配:
public class MainActivity extends AppCompatActivity { private List<myBean> myBeanList = new ArrayList<>();//用来存放数据的数组 @Override protected void onCreate(Bundle savedInstanceState) { super.onCreate(savedInstanceState); setContentView(R.layout.activity_main); ListView listView = (ListView) findViewById(R.id.listview); init(); myAdapter adapter = new myAdapter(MainActivity.this,R.layout.myitem,myBeanList); listView.setAdapter(adapter); } private void init(){//初始化数据 myBean bean1 = new myBean("aa",R.mipmap.ic_launcher); myBeanList.add(bean1); myBean bean2 = new myBean("ss",R.mipmap.ic_launcher); myBeanList.add(bean2); myBean bean3 = new myBean("jj",R.mipmap.ic_launcher); myBeanList.add(bean3); myBean bean4 = new myBean("hh",R.mipmap.ic_launcher); myBeanList.add(bean4); myBean bean5 = new myBean("dd",R.mipmap.ic_launcher); myBeanList.add(bean5); myBean bean6 = new myBean("cc",R.mipmap.ic_launcher); myBeanList.add(bean6); myBean bean7 = new myBean("bb",R.mipmap.ic_launcher); myBeanList.add(bean7); myBean bean8 = new myBean("jj",R.mipmap.ic_launcher); myBeanList.add(bean8); myBean bean9 = new myBean("kk",R.mipmap.ic_launcher); myBeanList.add(bean9); }做到这里我想大家都几乎初步掌握了怎么定制ListView了吧?哦对了!我在写适配器的时候顺便把监听事件写进去了,当然在主类写也是可以的,但是不建议这样做。至于为什么?你自己试试就知道了,因为纸上得来终觉浅嘛。
最后上一张效果图吧:
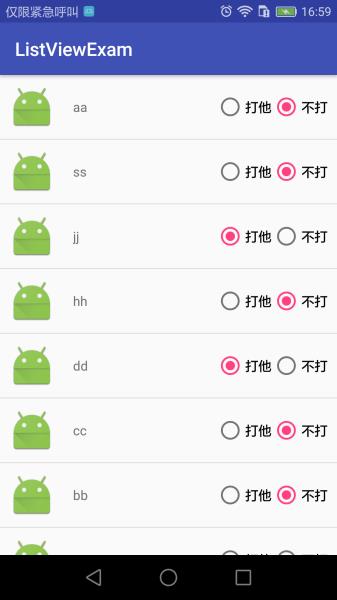
发现有好多BUG呢!不过那都不是事,毕竟没有哪个APP是没有BUG的是不是?
免责声明:本文仅代表文章作者的个人观点,与本站无关。其原创性、真实性以及文中陈述文字和内容未经本站证实,对本文以及其中全部或者部分内容文字的真实性、完整性和原创性本站不作任何保证或承诺,请读者仅作参考,并自行核实相关内容。文章投诉邮箱:anhduc.ph@yahoo.com